Difference between revisions of "Beginners Guide"
Tag: Undo |
m |
||
| (6 intermediate revisions by one other user not shown) | |||
| Line 1: | Line 1: | ||
| − | + | __FORCETOC__ | |
| − | |||
== What is a node? == | == What is a node? == | ||
A node, in simplest terms, is a computer that connects to the AllStarLink network. Nodes typically have an RF radio interface as well as an internet connection. Radios can range in size from a repeater radio to a low power radio integrated into a node. A node allows you to connect to other nodes in the AllStarLink network. | A node, in simplest terms, is a computer that connects to the AllStarLink network. Nodes typically have an RF radio interface as well as an internet connection. Radios can range in size from a repeater radio to a low power radio integrated into a node. A node allows you to connect to other nodes in the AllStarLink network. | ||
| Line 31: | Line 30: | ||
While you are awaiting the verification of your account (usually within 24 hours) you may download one of the image files for you computer system you will use to run your AllStarLink node. | While you are awaiting the verification of your account (usually within 24 hours) you may download one of the image files for you computer system you will use to run your AllStarLink node. | ||
| − | |||
{{:Downloads}} | {{:Downloads}} | ||
| Line 37: | Line 35: | ||
== Flashing the ASL image == | == Flashing the ASL image == | ||
| − | + | {{:Flashing the ASL Image}} | |
| − | |||
| − | |||
| − | |||
| − | |||
| − | |||
| − | |||
| − | |||
| − | |||
| − | |||
| − | |||
| − | |||
| − | |||
| − | |||
| − | |||
| − | |||
| − | |||
| − | |||
| − | |||
| − | |||
== Login & Create a Server == | == Login & Create a Server == | ||
| Line 87: | Line 66: | ||
[[File:Asl_request_node2_.png|none|thumb|800x800px]] | [[File:Asl_request_node2_.png|none|thumb|800x800px]] | ||
| + | {{ Note|'''Your first node will be automatically approved. Subsequent nodes are subject to approval.''' }} | ||
Once your node number request(s) are processed you will receive an email. | Once your node number request(s) are processed you will receive an email. | ||
| Line 137: | Line 117: | ||
[[File:002_first_time.png|none|thumb|640x640px]] | [[File:002_first_time.png|none|thumb|640x640px]] | ||
| − | + | Since it is your first time setup, answer '''<Yes>''' so you can setup a "'''root'''" password. Don't forget to write down your user an password. | |
[[File:003_password.png|none|thumb|640x640px]] | [[File:003_password.png|none|thumb|640x640px]] | ||
| − | Setup now will ask if you want to | + | Setup now will ask if you want to change "'''repeater'''" account password with you should already changed at first time login so answer '''<No>''', unless you want to change it again. Do not forget to write it down. |
[[File:004_repeater_password.png|none|thumb|640x640px]] | [[File:004_repeater_password.png|none|thumb|640x640px]] | ||
| Line 316: | Line 296: | ||
[[File:101_asl_menu_4.png|none|thumb|640x640px]] | [[File:101_asl_menu_4.png|none|thumb|640x640px]] | ||
| − | With option '''<F>''', will | + | With option '''<F>''', will trigger PTT few times on your radio for testing, you should also listen a test tone. |
Next, with option '''<2>''', you can adjust the audio levels from your radio to your node node with the aim of an on-screen level meter. | Next, with option '''<2>''', you can adjust the audio levels from your radio to your node node with the aim of an on-screen level meter. | ||
| Line 336: | Line 316: | ||
== PTT and COS polarity settings == | == PTT and COS polarity settings == | ||
| − | + | Your radio may require PTT and/or COS/CTCSS polarity to be inverted to work properly. To do this, go to the main ASL menu and choose option '''<6>'''. | |
[[File:103_asl_menu_6.png|none|thumb|640x640px]] | [[File:103_asl_menu_6.png|none|thumb|640x640px]] | ||
| Line 342: | Line 322: | ||
[[File:104_config_menu_i.png|none|thumb|640x640px]] | [[File:104_config_menu_i.png|none|thumb|640x640px]] | ||
| − | You will be | + | You will be taken to a text file where you will need to find and edit some values: |
PTT invert: | PTT invert: | ||
| Line 348: | Line 328: | ||
Search for the line begining with '''invertptt =''' and change its value as follows: | Search for the line begining with '''invertptt =''' and change its value as follows: | ||
| − | '''0''' = Ground to | + | '''0''' = Ground to Transmit (most common). |
'''1''' = Open to Transmit. | '''1''' = Open to Transmit. | ||
| Line 355: | Line 335: | ||
COS/CTCSS invert: | COS/CTCSS invert: | ||
| − | Search for the line | + | Search for the line beginning with '''carrierfrom =''' and change its value as follows. |
| − | Search for the line | + | Search for the line beginning with '''ctcssfrom =''' and change its value as follows. |
'''no''' = No carrier detection at all. | '''no''' = No carrier detection at all. | ||
| − | '''usb''' = | + | '''usb''' = COR (COS) line active Hi. |
| − | '''usbinvert''' = | + | '''usbinvert''' = COR (COS) line active Low. |
[[File:106_invertcos.png|none|thumb|640x640px]] | [[File:106_invertcos.png|none|thumb|640x640px]] | ||
Latest revision as of 13:33, 14 March 2021
What is a node?
A node, in simplest terms, is a computer that connects to the AllStarLink network. Nodes typically have an RF radio interface as well as an internet connection. Radios can range in size from a repeater radio to a low power radio integrated into a node. A node allows you to connect to other nodes in the AllStarLink network.
Nodes take the form of an inexpensive Raspberry Pi computer or a PC running the Linux operating system.
How do I use AllStarLink?
If you have a local FM repeater that is AllStarLink enabled, you may already be using it! However, before attempting to control a local FM repeater, check with the owner(s) first before doing so -- ham radio etiquette applies.
AllStarLink is typically used in these ways:
- Via a FM repeater that is AllStarLink enabled. Controlled through DTMF commands, via the internet, or an autopatch.
- Via a local micro-node that is purchased by a HAM operator to join the AllStarLink network
- Via PC/Mac software that allows you to connect directly to a node. The microphone / speaker are used for audio.
- Via a mobile app such as DVSwitch Mobile to connect directly to a node.
- Via an autopatch
Getting on AllStarLink
- If you wish to create your own node, follow the directions below to create an account. After your account is active, you will need a suitable PC or Raspberry Pi computer to install AllStar onto.
- If you wish to use a local FM repeater that is AllStar enabled, you do not need an AllStar account. Check out our Active Nodes List to find a repeater near you. If you type your city name in the search box, you will be given a list of active nodes. However, before controlling any node via RF & DTMF, be sure to talk to the operator(s) of that node and receive permission first.
- For a list of possible commands, visit the AllStarLink Standard Commands page.
- Some nodes may be local/non public nodes, so look for information that the node is in fact public.
- If you wish to purchase a pre-made or complete node, check out our Radio Connections page for a list of vendors.
Creating an account
Go to https://allstarlink.org/ and click the <Sign Up> link. It may take up to 24 hours for your account to be verified.

Download an ASL image
While you are awaiting the verification of your account (usually within 24 hours) you may download one of the image files for you computer system you will use to run your AllStarLink node.
- ASL 1.01 Intel/AMD Latest AllStarLink installer for x86/AMD
- Pi 1.01 Latest AllStarLink image for the Raspberry Pi
- ASL Images AllStarLink Images
- ASL FAQ - Install ASL on your existing Debian box or VM
Note: The ASL 1.01 installer is a Network installer and still uses the dvswitch.org site to download the .deb install files.
ASL Beta Images
The distribution has been updated to Debian 10 (buster) to allow users to use the latest apt packages, kernels, and boot on a Raspberry Pi 2, 3, or 4. The core Asterisk AllStarLink version has also been updated to 2.0.0-beta, and has several updates and fixes. Beta images should only be used by advanced users. Use at your own risk.
Have fun!
Beta Download
- AllStarLink ASL 2.0.0-beta Images for Intel/AMD and the Raspberry Pi 2, 3, or 4
These are the same files but without html page in front of them:
- ASL Images Beta AllStarLink BETA Images Repository
- Pi2-3-4 BETA AllStarLink image for the Raspberry Pi 2, 3, or 4
Beta Documentation
Install from ASL Repository
As an alternative to installing the ASL image, you can install Debian 10 (11 and 12 soon, I hope) yourself and then add the ASL repo. This is the recommended procedure to install on a VM where a .iso cannot be uploaded. The DAHDI package can be finicky with newer kernels and this won't work if the Linux headers don't match the Linux kernel.
Install the ASL Repository
As root (or with sudo) run the following commands to install the ASL repo. Overwrite the keyring file if prompted.
apt update
apt install curl gpg

cd /tmp
wget http://apt.allstarlink.org/repos/asl_builds/install-allstarlink-repository
chmod +x install-allstarlink-repository
./install-allstarlink-repository
Install ASL
Next as root (or with sudo) run the following commands to install ASL.
apt -y install linux-headers-$(uname -r)
apt -y install asl-asterisk
apt -y install allstar-helpers
apt -y install asl-dahdi-linux
apt -y install asl-update-node-list
If you are installing on a Raspberry Pi add:
apt -y install asl-raspberrypi-kernel
apt -y install asl-raspberrypi-kernel-headers
Bug Reports
Have a problem with the new ASL? Submit a bug/issue report here:
https://github.com/AllStarLink/ASL-Live-Build/issues
Write the image file to media. Either a USB memory stick, CD or DVD, or a microSD card (Raspberry Pi).
Flashing the ASL image
For all operating systems, we recommend downloading and installing balenaEtcher. It's available for macOS, Windows, and Linux. If you're flashing for RaspberryPi, an SD card reader is required.
USB Thumbdrive (PC/Pi4)
1. Follow the directions below, but use a USB thumbdrive instead.
SD Card (Pi2-Pi4)
1. Open balenaEtcher
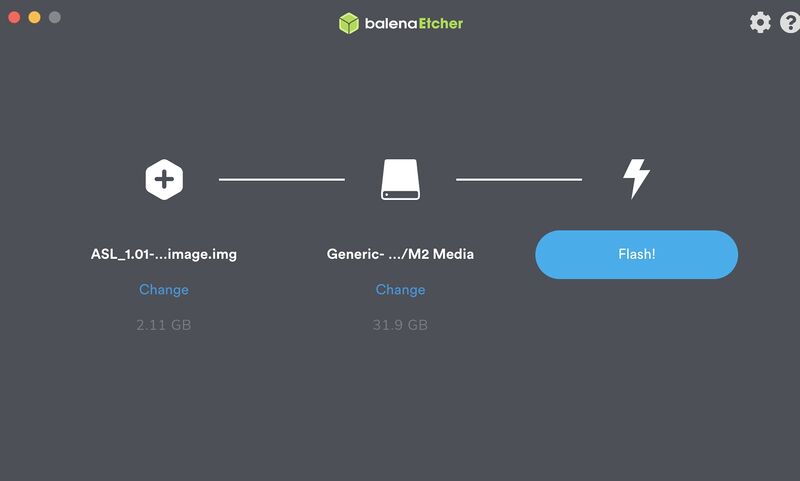
2. Insert your SD card into your SD card reader
3. Press "Select Image" and locate the downloaded image (e.g. ASL_1.01-20180228-armhf-raspbian-stretch-image)
4. If your SD card is ready to flash, you can simply press the "Flash!" button:
5. Insert your SD card into your Raspberry Pi and boot it up!
Login & Create a Server
Once your account is verified, login to your account at https://www.allstarlink.org/

You will need to create a "server" : Click on <Portal> then <Server Settings>.

Click on <Add a new server>.
Please take the time to read the instructions on each page.
Then click <Proceed with Server Setup> if needed.
Fill in all of the information and click <Submit> at the bottom of the page.

Request a Node number
At the top of the page, click <Portal> and then on <Node Settings>.

Then click <Request a new node number>.

Select which server you would wish to have a node number assigned to
if you need more than one node number for the same server, repeat this process
A comment of 'additional node on same server' would be appropriate

Once your node number request(s) are processed you will receive an email.
Edit Node settings
Log into your account on https://allstarlink.org/
Click <Portal> then <Node settings>.
The AllStarLink node numbers that have been assigned to you are displayed here.
Select which node you wish to view/edit.
Fill in the information for you node and click <Submit>.

Write down your node number, password and the call sign you assigned for the node as you will use them to configure your AllStarLink system.
Install and configure ASL to your computer
Consult your owners manual or your favorite internet search engine for how to install an image for your computer system.
Install the AllStarLink disk image to your computer. Insert the appropriate media for your system and boot the computer.
When the login prompt appears enter the user ID of
repeater
and press <Enter>.
Enter the default password of
allstarlink
Follow the on screen instructions for the initial password change.
For users familiar with the linux operation system you may proceed to edit the system manually.
For users not familiar with linux and ASL, at the Linux CLI (command line interface)
Type sudo asl-menu as the example below shows.
repeater@repeater:~$ sudo asl-menu
This will load the AllStarLink configuration menu.

AllStarLink software setup
Choose option <1>.

Since it is your first time setup, answer <Yes> so you can setup a "root" password. Don't forget to write down your user an password.
Setup now will ask if you want to change "repeater" account password with you should already changed at first time login so answer <No>, unless you want to change it again. Do not forget to write it down.

Now lets set time zone <Ok>.

Choose the node's continent.

Choose the node's city.

Next you can change the name of you host name, the default is repeater.

Answer <Yes> to be able to make changes.

Type the new host name and hit <Enter>.

If you want to set up a domain, type it and hit <Enter>.

Say <Ok> to this message.

Now you can make your network settings <Ok>.

Just say <Ok> to this message.

To choose between DHCP or Static IP say <Yes>.

Use <D> for DHCP or <S>. for Static, if you choose Static, you will be asked to enter it next, for this example DHCP is in use.

Just say <Ok> to this message.

Just say <Ok> to this message.

Just say <Ok> to this message.

Choose option <A1>.

Choose option <N1>.

Type the node number for your node. Yes the one you previously wrote down from AllStarLink site.

Choose option <N2>.

Type the node password for your node. Yes the one you previously wrote down from AllStarLink site.

Choose option <N3>.

Type the call sign for your node. Yes the one you previously wrote down from AllStarLink site.

Choose option <N4>.

Choose option <I1>.

Just say <Ok> to this message.

Choose option <N5>.

If your node will be a simplex node type <1>. If your node is a repeater controller type <2>.

Choose option <N6>.

Type a new password, this will be used to have access from the nodes web site Allmon2, the default password is 'llcgi'.

Just say <Ok> to this message.

Just say <Ok> to this message.

Choose option <N9>.

Just say <Ok> to this message.

Just say <Ok> to this message.

Just say <Ok> to this message.

Just say <Ok> to this message.

Just say <Ok> to this message.

Just say <Ok> to this message.

Just say <Ok> to this message.

Choose option <Back>.

Choose option <AZ>.

Review what you wrote down with what you have configured on your systemand press <Enter>.

Choose <Yes> to backup your configuration.

Just say <Ok> to this message.

Just say <Ok> to this message.

Just say <Ok> to this message.

Choose option <Exit>.

Answer <Yes>, because we already saved our configuration.

If you want to automatically start your system with this menu answer <Yes>, if not then <No>.

If you answer was <No>, remember you can come back to this menu typing sudo asl-menu as the following example:
repeater@repeater:~$ sudo asl-menu

Now your node will reboot to apply all the changes we have done, so say <Ok>.

Determine Radio Interface
You'll need to hook your node to a radio of your choice.
Radio Connections - Determine type of radio connection
AllStarLink Audio settings with SimpleUSB
Once you've hooked up a radio with your desired interface, it's time to test and tune the audio from the radio.
type sudo asl-menu like the example below:
repeater@repeater:~$ sudo asl-menu
Choose option <4>.

With option <F>, will trigger PTT few times on your radio for testing, you should also listen a test tone.
Next, with option <2>, you can adjust the audio levels from your radio to your node node with the aim of an on-screen level meter.
With another radio transmit a test tone or voice and type values between 0 and 999 followed by <Enter> to apply them, if you do not set any value and hit <Enter>, you will exit this function keeping the last typed value on RAM.
Next, type option <T>, you can toggle a tone generator to adjust your node to radio audio levels, so type it once to turn it on.
Now typing option <3>, will allow you to adjust the audio from your node to your Tx radio.
To achieve that, you can type values between 0 and 999 and press <Enter> to apply the new value. The system will Tx a test tone for 5 seconds. If you do not set any value and hit <Enter>, you will exit this function keeping the last typed value on RAM.
Do not forget to turn of the tone generator by pressing once again <T>.
Once you are happy with your settings, type <W> and <Enter>.
To exit from this menu type <0> (zero) and hit <Enter>.
PTT and COS polarity settings
Your radio may require PTT and/or COS/CTCSS polarity to be inverted to work properly. To do this, go to the main ASL menu and choose option <6>.

Choose option <I>.

You will be taken to a text file where you will need to find and edit some values:
PTT invert:
Search for the line begining with invertptt = and change its value as follows:
0 = Ground to Transmit (most common).
1 = Open to Transmit.

COS/CTCSS invert:
Search for the line beginning with carrierfrom = and change its value as follows.
Search for the line beginning with ctcssfrom = and change its value as follows.
no = No carrier detection at all.
usb = COR (COS) line active Hi.
usbinvert = COR (COS) line active Low.

After making your changes type <CTRL> + <X> and then type <Y> followed by <Enter>. You will be back to the previous menu and choose <Back>.
Choose Option <9>.

Choose option <G> to restart AllStarLink software and apply changes. Choose <Back>, repeat your audio test if needed.

At this point your node should be up and running.
Allmon2 Setup
AllMon2 is a web based portal for controlling and monitoring your node and who's connected to it.
- Allmon2 Install and Setup - Allmon2 Setup